
How to Replace a Valve Stem: A Practical Guide for Tire Service and Vehicle Owners
A leaking or damaged tire valve stem may seem like a small problem, but it can lead to gradual air loss and repeated tire pressure issues. If you are asking how to replace a valve stem, the correct method depends on the type of valve, the wheel design, and whether the tire must be removed from the rim.
For standard snap-in rubber valve stems, replacement is a common tire service procedure. However, the work should be carried out carefully because incorrect installation can damage the valve stem, wheel, or tire bead.
This guide explains the basic valve stem replacement process, the tools commonly used, and the main points to check before and after installation.
What Is a Tire Valve Stem?
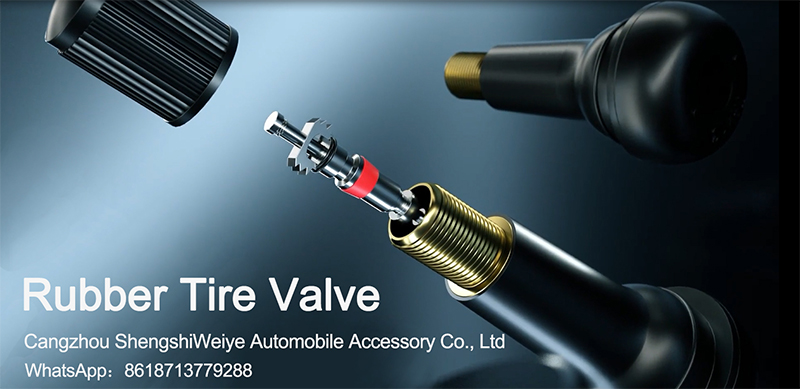
A tire valve stem is the component that allows air to enter and remain inside a tire. It is installed through the valve hole in the wheel and works together with the valve core and valve cap.
A typical tire valve assembly includes:
- Valve stem body
- Valve core
- Valve cap
- Rubber sealing area or sealing gasket, depending on the design
Different vehicles use different types of tire valves. Common options include snap-in rubber valve stems, clamp-in metal valve stems, truck and bus valves, and TPMS valve stems.
Before replacing a valve, always identify the correct type and specification for the wheel.
When Should You Replace a Valve Stem?
Valve stems should be inspected whenever tires are serviced. Replacement may be necessary if you notice:
- A visible crack in the rubber
- Air leaking from the base of the valve
- A bent or damaged valve stem
- Corrosion around a metal valve
- A damaged valve thread
- A valve that no longer seals correctly
- Repeated tire pressure loss with no obvious puncture
For rubber valve stems, aging and exposure to heat, sunlight, moisture, and road conditions can gradually affect the rubber.
If a valve stem is damaged, simply replacing the valve core may not solve the problem. The source of the leak should be identified before replacing any parts.
Tools Needed to Replace a Valve Stem
The exact tools depend on the valve type and whether the tire is removed from the wheel.
For a standard tire service procedure, commonly used tools include:
- Tire changer
- Valve core removal tool
- Valve stem puller or installation tool
- Tire mounting lubricant
- Air source
- Tire pressure gauge
- Leak detection solution or soapy water
- Correct replacement valve stem
Professional workshops may also use additional equipment depending on the vehicle and wheel type.
Always select a valve stem that matches the wheel's valve hole and the intended tire application.
How to Replace a Valve Stem: Step-by-Step
Step 1: Confirm the Type of Valve Stem
Before starting, identify the existing valve.
Is it a standard snap-in rubber valve stem? A clamp-in metal valve? A TPMS valve stem?
The replacement method is different for each type.
For example, a standard rubber snap-in valve is pulled through the wheel from the inside, while many metal clamp-in valves use a sealing washer and retaining nut.
TPMS valve stems may also require additional care because they are connected to a tire pressure monitoring sensor.
Step 2: Deflate the Tire Completely
Remove the valve cap and use a valve core tool to remove the valve core.
Allow all air to escape from the tire before breaking the bead.
Never attempt to remove a tire valve stem from a pressurized tire.
After deflation, confirm that the tire has completely lost pressure before continuing.
Step 3: Break the Tire Bead Near the Valve Area
To access the valve stem from inside the wheel, the tire bead usually needs to be separated from the rim.
Using suitable tire service equipment, carefully break the bead near the valve area.
The tire does not always need to be completely removed from the wheel when replacing a standard valve stem, depending on the equipment and service method used.
However, enough space must be available to safely remove the old valve and install the new one.
Care should be taken to avoid damaging the tire bead or wheel surface.
Step 4: Remove the Old Valve Stem
For a snap-in rubber valve stem, the old valve can be removed from the wheel after the tire has been deflated and the bead has been moved away from the valve area.
If the valve is being cut or removed, take care not to damage the valve hole in the wheel.
For metal clamp-in valves, remove the retaining nut and sealing components according to the valve manufacturer's design.
Do not reuse damaged seals, washers, or valve components unless the manufacturer specifically allows them to be reused.
Step 5: Inspect and Clean the Valve Hole
Before installing the new valve stem, inspect the valve hole carefully.
Check for:
- Sharp edges
- Corrosion
- Dirt or debris
- Damage around the valve hole
The valve hole should be clean and in good condition.
Damage around the hole can prevent the new valve from sealing correctly.
If the wheel itself is damaged, replacing the valve stem alone may not solve the air leak.
Step 6: Install the New Valve Stem
For a standard snap-in valve, insert the valve through the wheel from the inside.
Use a proper valve installation tool to pull the stem into position.
Do not use excessive force. Pulling the valve incorrectly can damage the rubber sealing area or stretch the valve.
The valve should seat correctly in the wheel and remain straight.
For clamp-in metal valves, follow the specified installation procedure and tightening requirements for that valve design.
Avoid overtightening the retaining nut, as excessive force may damage the valve, seal, or wheel.
Step 7: Reinstall and Inflate the Tire
Once the new valve stem is correctly installed, reposition the tire bead if necessary.
Apply an appropriate tire mounting lubricant to the bead area when required.
Inflate the tire using proper tire service procedures until the bead is correctly seated.
Then adjust the tire pressure to the vehicle manufacturer's recommended specification.
Do not rely on the maximum pressure printed on the tire sidewall as the normal operating pressure unless it matches the vehicle manufacturer's recommendation.
Step 8: Check for Air Leaks
After installation, check the new valve stem for leaks.
A leak detection solution or soapy water can be applied around:
- The valve stem base
- The valve core area
- The valve cap area
Look for continuous bubbles that may indicate an air leak.
If a leak is found, identify the source before returning the vehicle to service.
A leak at the valve core may require inspection or replacement of the core. A leak at the base may indicate incorrect installation, a damaged valve hole, or an unsuitable valve stem.
Step 9: Install the Valve Cap
After confirming that there are no leaks, install a suitable valve cap.
The valve cap helps protect the valve core from dirt, dust, and moisture.
Although the valve core is responsible for sealing air pressure, a properly fitted cap provides additional protection and should not be overlooked.
Can You Replace a Valve Stem Without Removing the Tire?
In many standard tire service situations, the entire tire does not need to be removed from the wheel.
However, the tire must be completely deflated, and the bead generally needs to be moved away from the valve area to access the valve stem correctly.
Some special tools are marketed for replacing certain valve components without removing the tire from the rim. These tools may be suitable for specific repair situations, but the correct method depends on the valve type and the condition of the tire and wheel.
For a complete valve stem replacement, professional tire service equipment is often the safest and most reliable option.
How Long Does It Take to Replace a Valve Stem?
For an experienced tire technician using the proper equipment, replacing a standard valve stem can often be completed within a short service appointment.
The actual time depends on:
- The type of valve
- The wheel design
- The condition of the tire
- Whether the tire must be removed
- Whether corrosion is present
- Whether the vehicle uses TPMS
A simple rubber snap-in valve replacement generally takes less time than replacing a damaged TPMS valve assembly or a corroded metal clamp-in valve.
Should You Replace the Valve Stem When Replacing Tires?
Many tire service professionals inspect and often replace standard rubber valve stems when installing new tires.
This can be a practical choice because the tire is already being removed from the wheel.
Replacing an aging valve stem at the same time may help prevent a future air leak and avoid another tire service visit.
However, TPMS valves and metal valve stems may have different service requirements. The correct replacement procedure should follow the manufacturer's recommendations.
How to Choose the Right Replacement Valve Stem
Before purchasing a replacement, check the following:
Valve Type
Confirm whether the wheel uses a snap-in rubber valve, clamp-in metal valve, truck valve, or TPMS valve.
Valve Hole Size
The replacement valve must fit the wheel's valve hole correctly.
Tire and Vehicle Application
Passenger cars, trucks, buses, motorcycles, and other vehicles may require different valve specifications.
Operating Conditions
For high-pressure or commercial applications, select a valve designed for the required pressure and service conditions.
Material Requirements
Rubber, brass, aluminum, and other materials may be used depending on the valve design and application.
Selecting the correct valve stem is essential for reliable sealing and safe tire operation.
Common Mistakes to Avoid When Replacing a Valve Stem
Several mistakes can cause problems after installation.
Avoid:
- Installing the wrong valve size
- Replacing a valve without completely deflating the tire
- Damaging the wheel's valve hole
- Using excessive force during installation
- Reusing damaged sealing components
- Overtightening metal valve nuts
- Ignoring a leak after installation
- Forgetting to reinstall the valve cap
- Using the wrong service procedure for TPMS valves
For TPMS-equipped wheels, extra care is required to avoid damaging the sensor assembly.
Final Thoughts
If you are wondering how to replace a valve stem, the first step is to identify the correct valve type and follow the appropriate installation method.
For a standard snap-in rubber valve stem, the basic process involves completely deflating the tire, moving the bead away from the valve area, removing the old valve, inspecting the valve hole, installing the new valve, reinflating the tire, and checking carefully for leaks.
For metal and TPMS valve stems, the procedure can be more specialized.
Using the correct replacement valve, proper tire service tools, and careful installation helps ensure a reliable seal and reduces the risk of future tire pressure problems.
For tire shops, distributors, and automotive service professionals, maintaining a complete range of tire valve stems can help meet the needs of passenger cars, commercial vehicles, and different wheel applications.
Frequently Asked Questions
Can I replace a tire valve stem myself?
A standard valve stem can be replaced with the proper tools and tire service knowledge. However, the tire must be completely deflated, and incorrect procedures can damage the tire or wheel. Professional service is recommended if you are unfamiliar with tire repair equipment.
Do I have to remove the tire to replace a valve stem?
The entire tire may not always need to be removed from the wheel, but the tire must be deflated and the bead usually needs to be moved away from the valve area to access and replace the valve stem properly.
How much does it cost to replace a valve stem?
The cost varies depending on the valve type, labor charges, vehicle, and whether the tire needs to be dismounted. TPMS and metal valve replacements can cost more than standard rubber snap-in valves.
Why is my tire losing air around the valve stem?
Possible causes include a cracked rubber valve, damaged valve core, loose metal valve components, damaged seals, corrosion, or damage around the wheel's valve hole.
Should I replace the valve stem when replacing tires?
Standard rubber valve stems are commonly inspected and often replaced during tire replacement. The tire is already being serviced, making it a convenient time to replace an aging valve.
Is a valve stem the same as a valve core?
No. The valve stem is the main component installed through the wheel, while the valve core is a smaller internal component that controls airflow and helps seal the valve.
Get a Bulk Quote / Inquiry:
If you are looking for a reliable supplier or need a custom wholesale price, contact our sales representative instantly via WhatsApp or Email.

